Installation
In this article:
Requirements
For general information on system requirements see Requirements.
Report Builder
In order to build reports on the website and to export lists in Microsoft Excel format the following libraries have to be installed:
- Report Viewer 2010
- Report Viewer 2012
- Which needs SQLSysClrTypes
IIS Features
Execute the following command to enable IIS features on the application server:
CMD.EXE /C DISM.EXE /enable-feature /all /online /featureName:IIS-WebServerRole /featureName:IIS-WebServer /featureName:IIS-CommonHttpFeatures /featureName:IIS-StaticContent /featureName:IIS-DefaultDocument /featureName:IIS-DirectoryBrowsing /featureName:IIS-HttpErrors /featureName:IIS-HttpRedirect /featureName:IIS-ApplicationDevelopment /featureName:IIS-ASPNET /featureName:IIS-NetFxExtensibility /featureName:IIS-ASPNET45 /featureName:IIS-NetFxExtensibility45 /featureName:IIS-ASP /featureName:IIS-CGI /featureName:IIS-ISAPIExtensions /featureName:IIS-ISAPIFilter /featureName:IIS-ServerSideIncludes /featureName:IIS-HealthAndDiagnostics /featureName:IIS-HttpLogging /featureName:IIS-LoggingLibraries /featureName:IIS-RequestMonitor /featureName:IIS-HttpTracing /featureName:IIS-CustomLogging /featureName:IIS-ODBCLogging /featureName:IIS-Security /featureName:IIS-BasicAuthentication /featureName:IIS-WindowsAuthentication /featureName:IIS-DigestAuthentication /featureName:IIS-ClientCertificateMappingAuthentication /featureName:IIS-IISCertificateMappingAuthentication /featureName:IIS-URLAuthorization /featureName:IIS-RequestFiltering /featureName:IIS-IPSecurity /featureName:IIS-Performance /featureName:IIS-HttpCompressionStatic /featureName:IIS-HttpCompressionDynamic /featureName:IIS-WebDAV /featureName:IIS-WebServerManagementTools /featureName:IIS-ManagementScriptingTools /featureName:IIS-ManagementService /featureName:IIS-IIS6ManagementCompatibility /featureName:IIS-Metabase /featureName:IIS-WMICompatibility /featureName:IIS-LegacyScripts /featureName:IIS-FTPServer /featureName:IIS-FTPSvc /featureName:IIS-FTPExtensibility /featureName:NetFx4Extended-ASPNET45 /featureName:IIS-ApplicationInit /featureName:IIS-WebSockets /featureName:IIS-CertProvider /featureName:IIS-ManagementConsole /featureName:IIS-LegacySnapIn /norestart
See Download Script.
Microsoft SQL Server
For information about supported SQL Server versions see Supported Configurations.
The installation of the SQL Server will be described in the following section.
Installation Setup
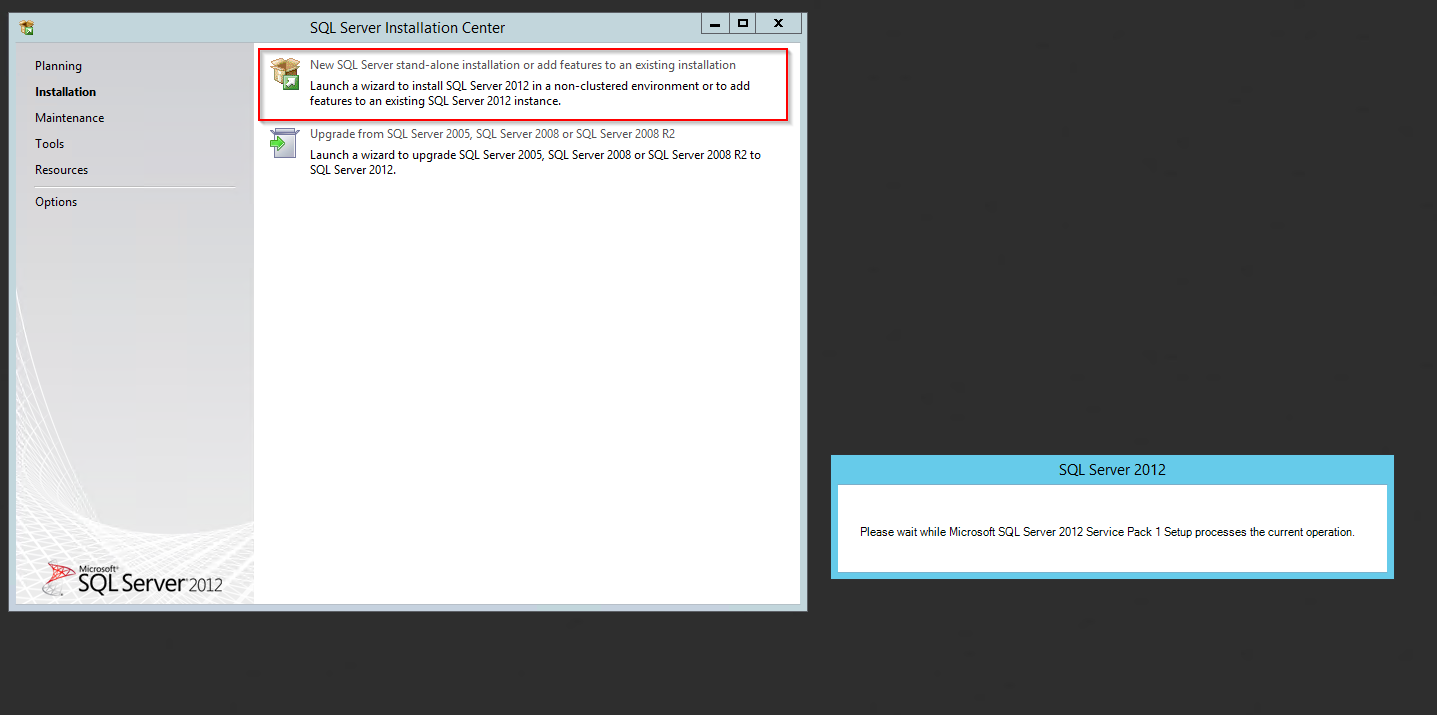
Start the SQL Server installation setup. Choose the option “New SQL Server stand-alone installation…” in the follwing Window:
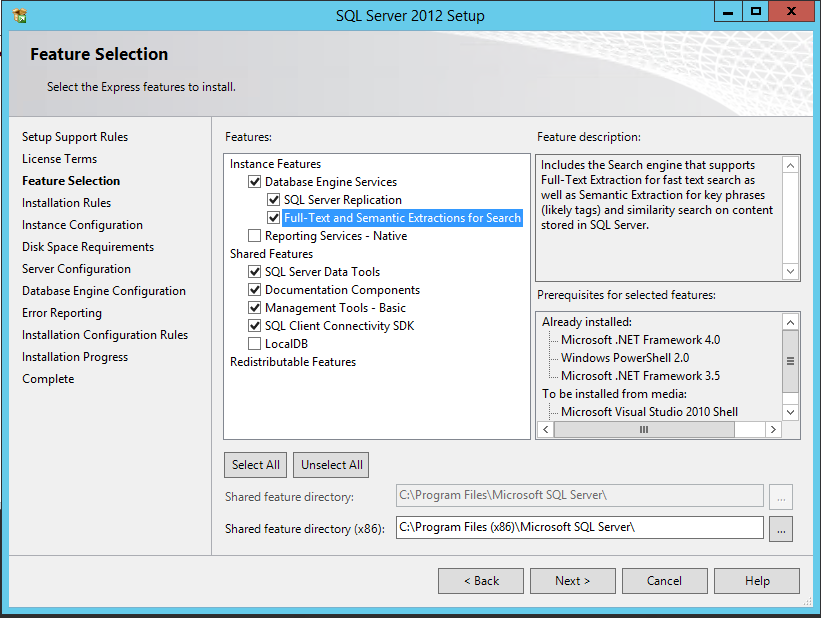
Throughout the installation, please choose the same features as shown below:
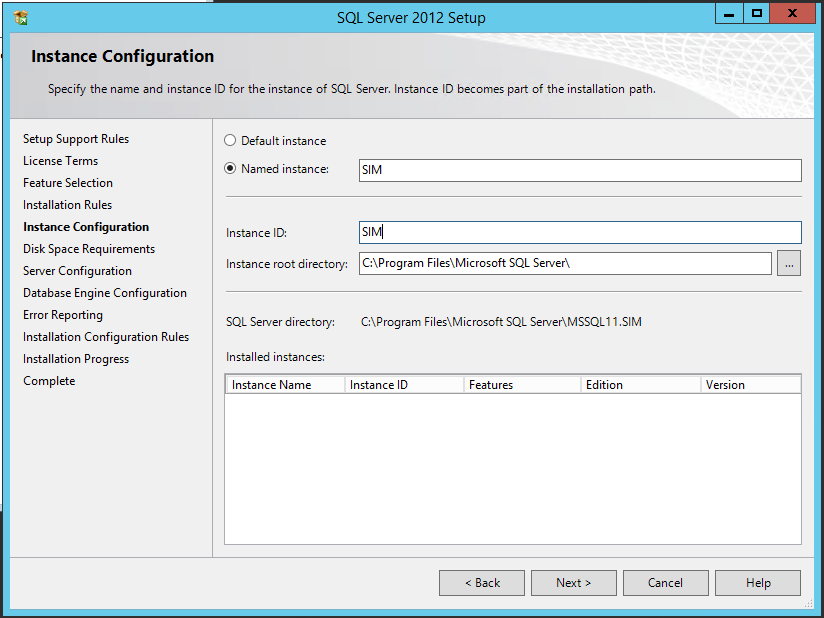
Name the instance SIM or choose another name:
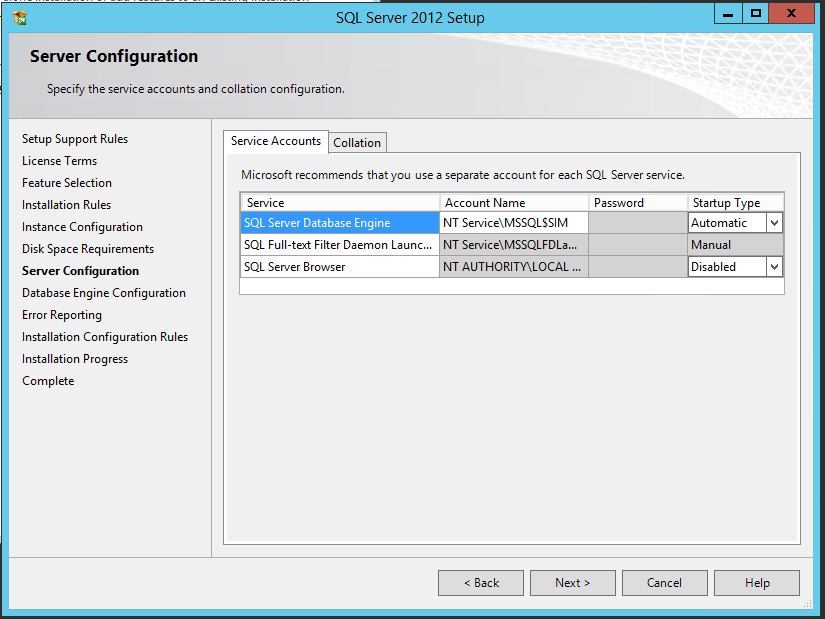
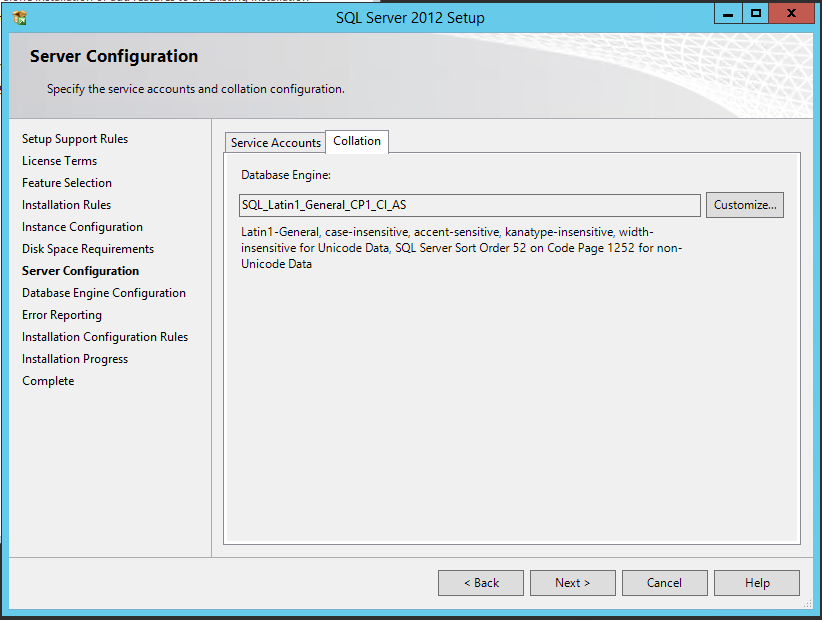
Configurate the server as follows:
Choose the Database Engine called ‘SQL_Latin_General_CP1_CI_AS’:
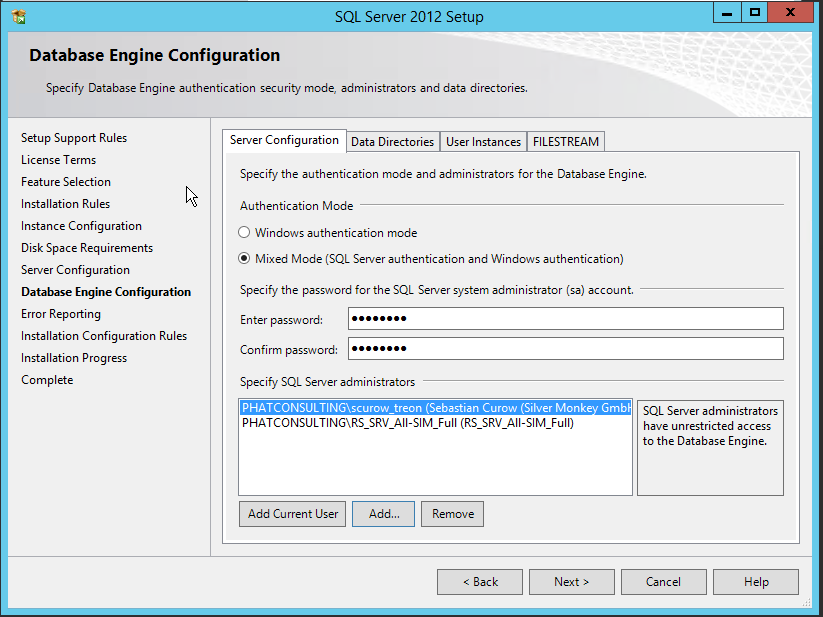
Select the ‘mixed mode’-authentification and add your SQL service account as SQL Server administrator:
You have completed the setup!
SQL Server TCP/IP Configuration
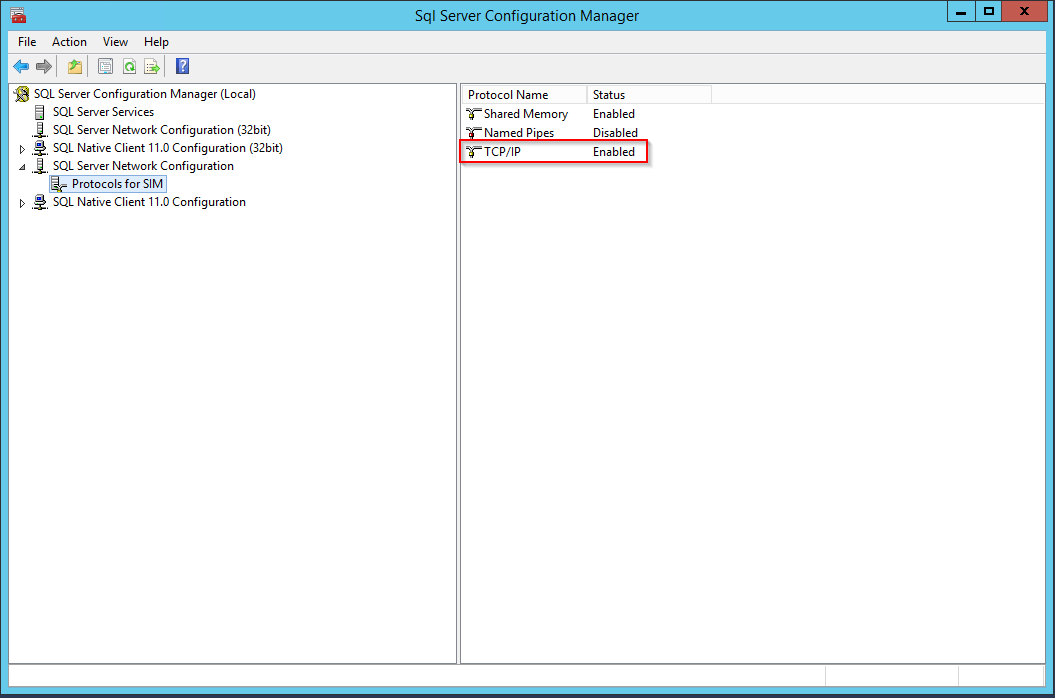
Open the SQL Server Configuration Manager, choose ‘SQL Server Network Configuration’ and then ‘Protocols for [Database Name]’. Change the TCP/IP Status to Enabled:
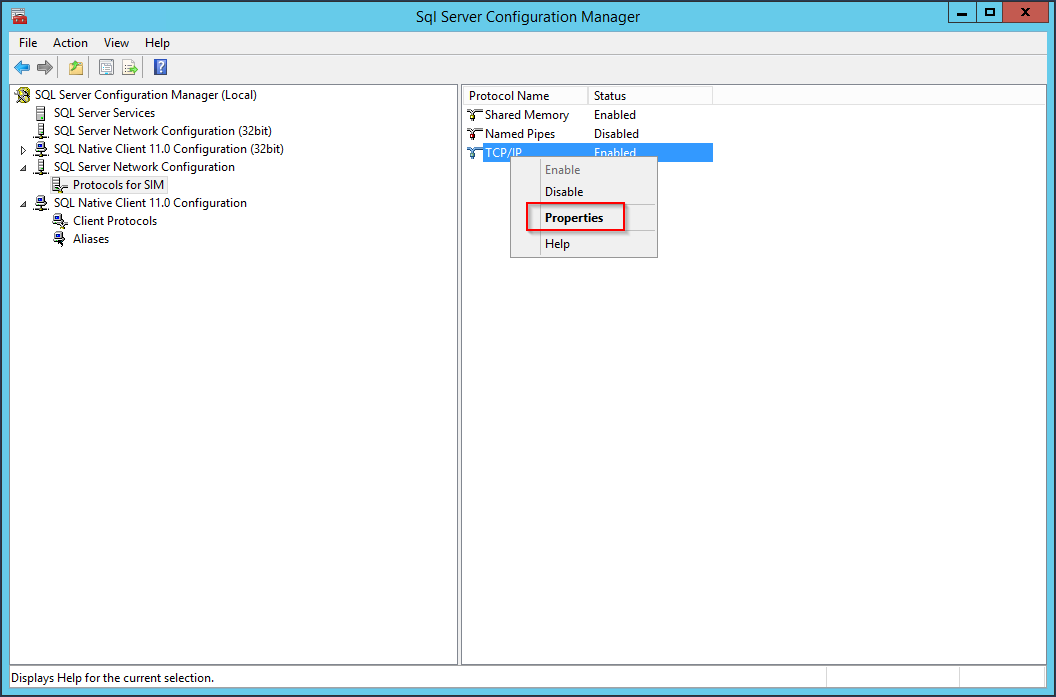
Right-click the TCP/IP line and choose ‘Properties’:
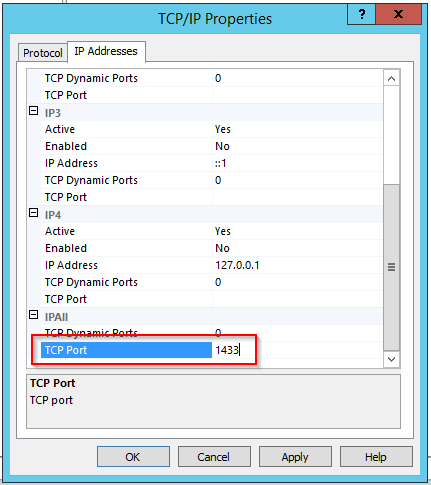
Choose the tab “IP Adresses” and change the ‘TCP Port’-entry to 1433:
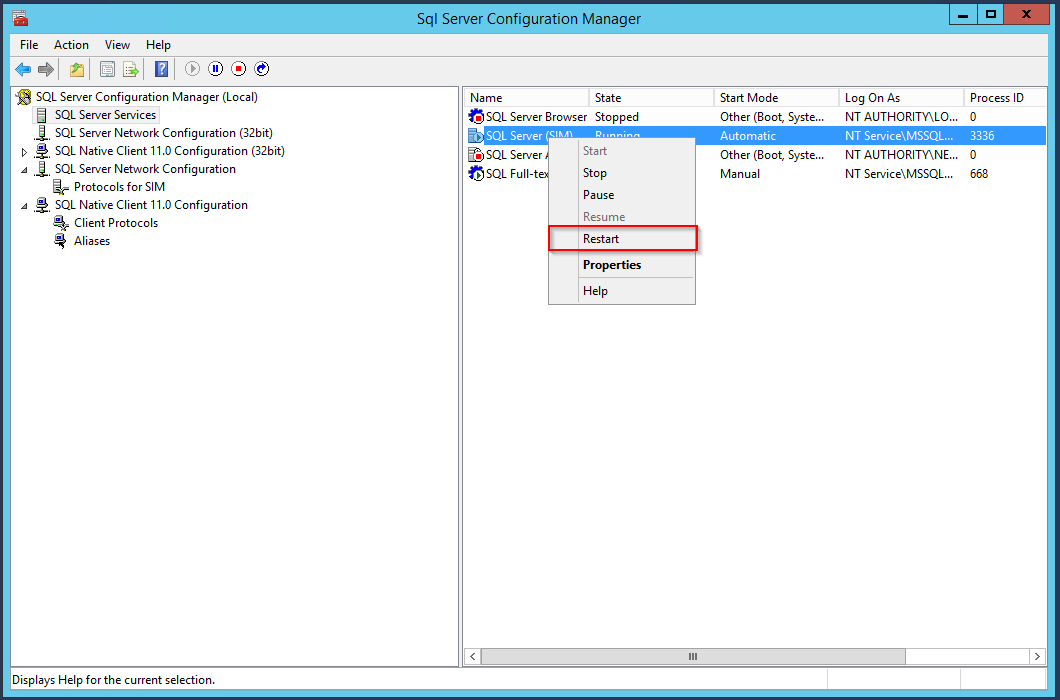
Afterwards, navigate to the SQL Server Services and restart the ‘SQL Server ([Database Name])’:
SIM SQL DB Service Account
Visit KB00020 - SIM SQL Database Rights to see how to create the Silver Monkey service account necessary for the DB connection.
You have finished the basic SQL Server installation for Silver Monkey.
Website Files
Copy the basic configuration of the website to the specified path on the web application server:
*C:\inetpub\wwwroot\[HERE]*
Example:
*C:\inetpub\wwwroot\SIM_R001*
This configuration will be customized later based on the customer requirements.
Tip
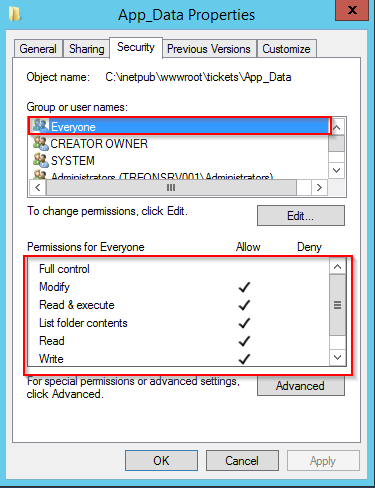
Make sure that the role “Everyone” has the permission to “Modify, Read& execute, List folder contents, Read, Write” to the App_Data folder (as seen below)
Database
Install the Silver Monkey Database Backup. The Backup is part of the installation Package.
See: KB00004 - Restoring SIM Database for more Information.
IIS Configuration
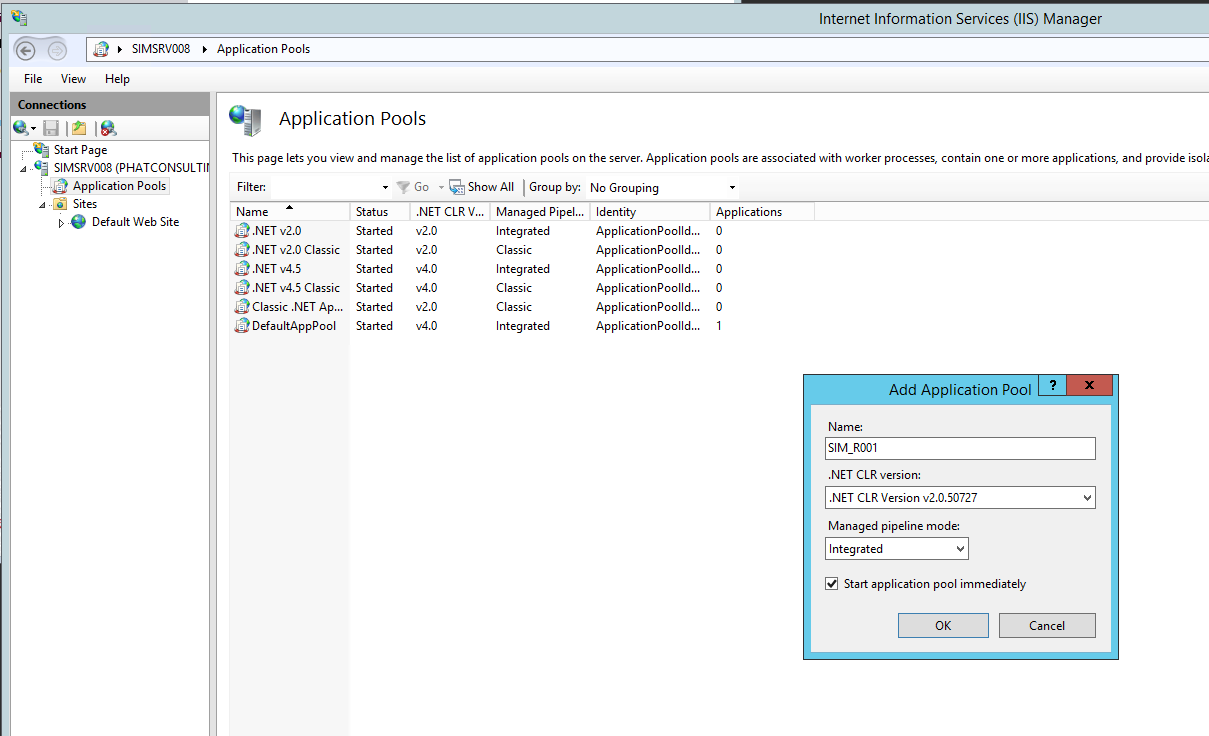
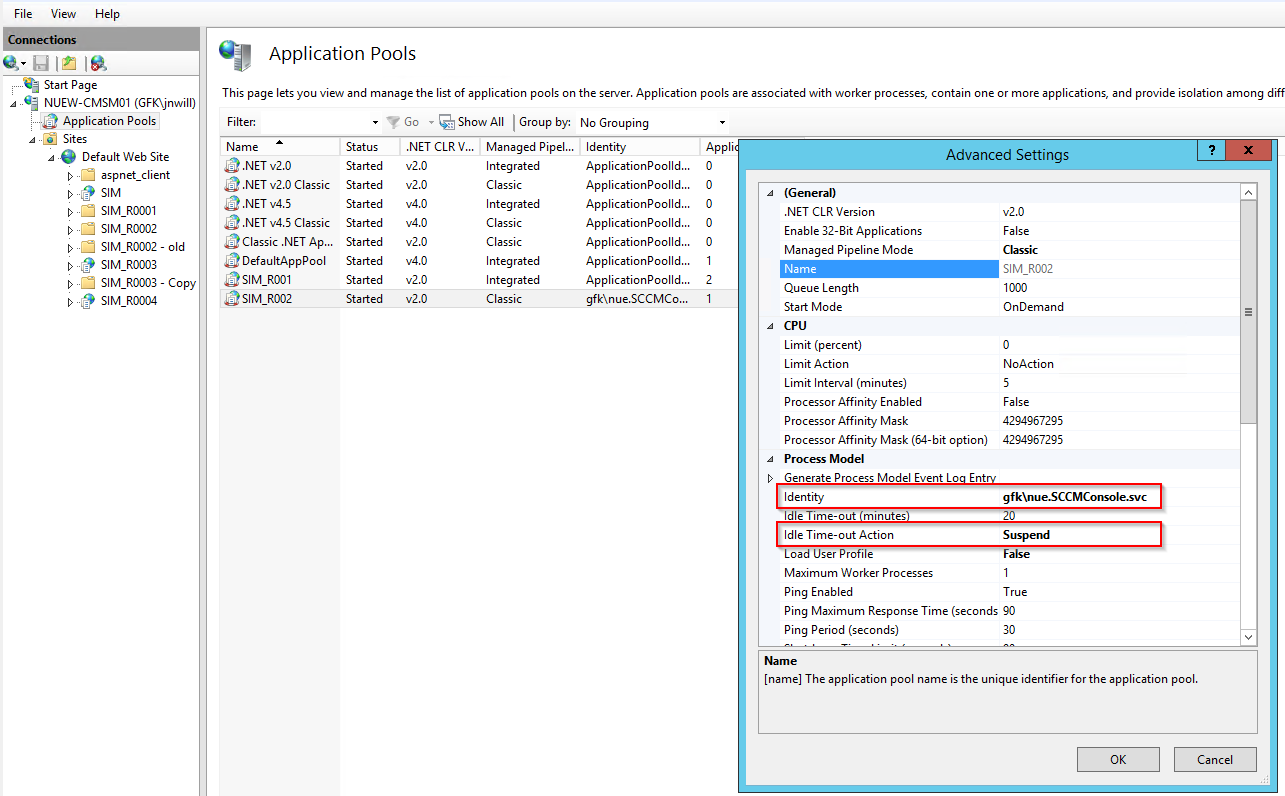
Open the IIS (Internet Information Services) Manager. An app pool has to be created for the SIM Packaging website with the .NET CLR Version ‘v2.0.50727’ and the ‘Integrated’ Managed pipeline mode.
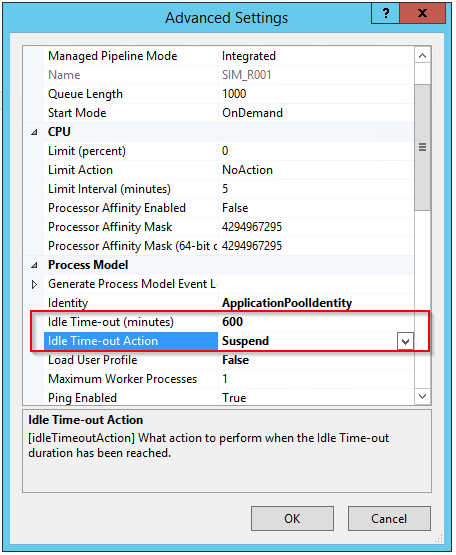
Navigate to the advanced settings of the created application pool (Figure 3) and set the ‘Idle Time-out(minutes)’ parameter to ‘600’. Set the ‘Idle Time-out Action’ parameter to ‘Suspend’.
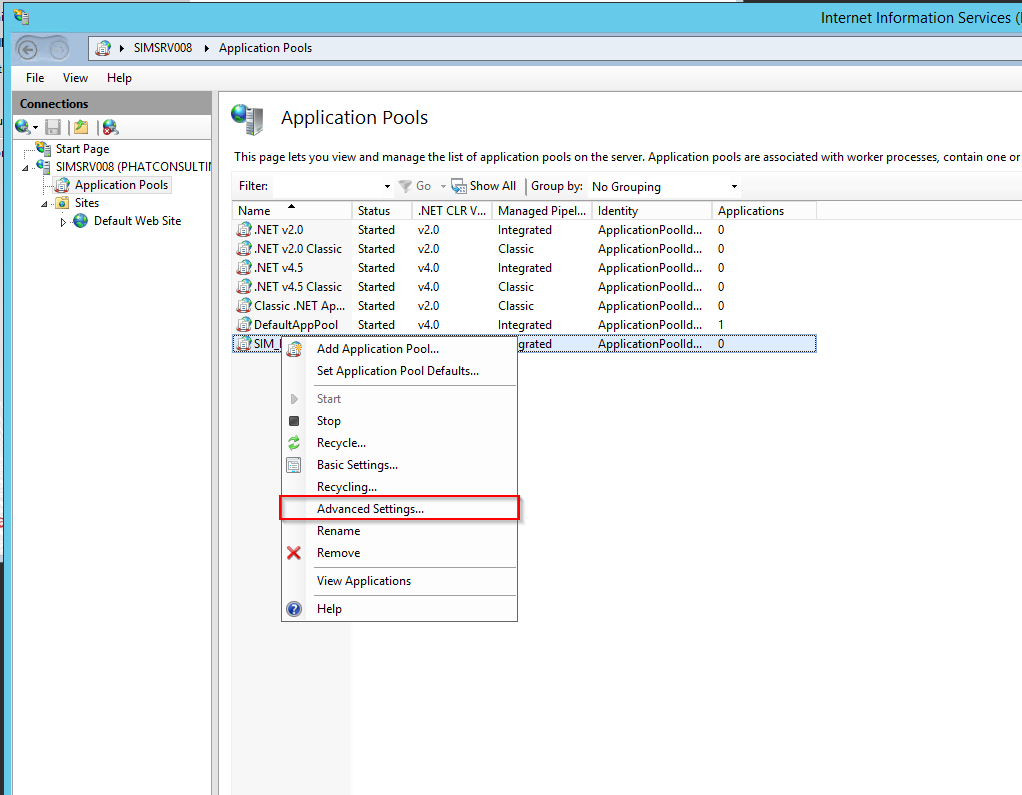
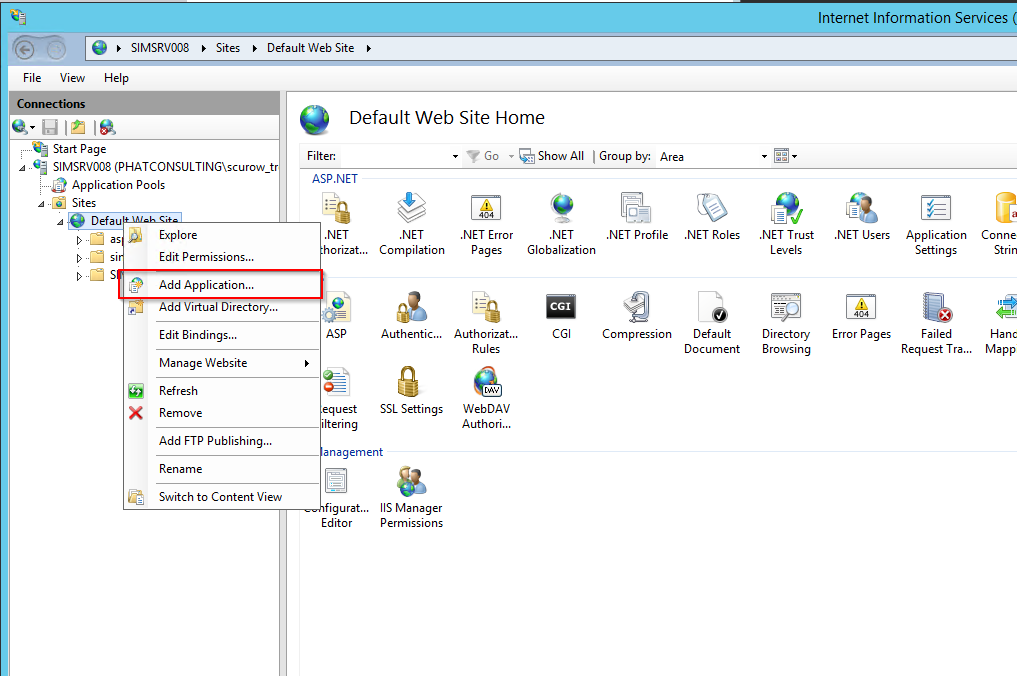
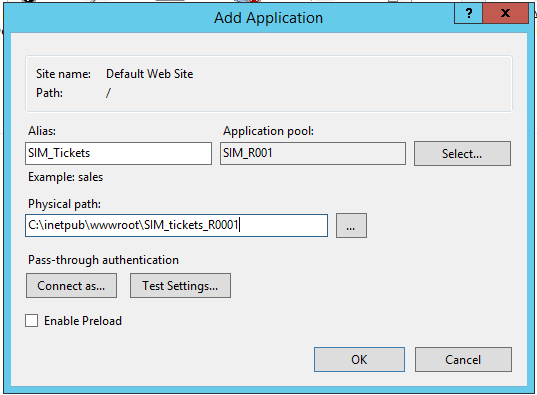
Next, choose the ‘Add Application’ option in the right-click dialogue of the Default Web Site, choose the name of the application, the application pool that has just been created and the website folder that you copied in the C:inetpub\wwwroot… directory.
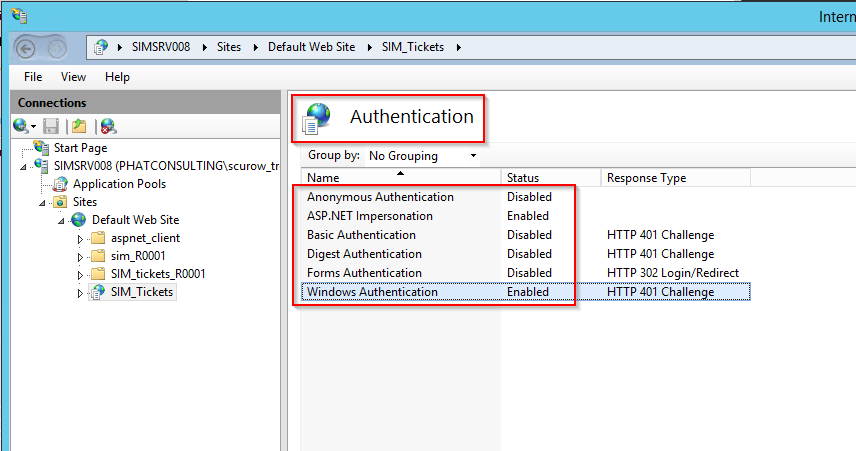
After this navigate to the ‘Authentication’ settings of the new application. Set the authentication as seen below:
For some features, it is necessary that a second AppPool is created using these settings:
Licence
Your Licence is part of the license certificate. Your can find an Information on this topic here: KB00013 - Activating and Updating License Key
Setting up Database Connection
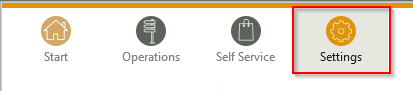
Silver Monkey Administrator rights are required to set or update the SQL Server Connection via the user interface. If the “Settings”-Tab is visible, you got the required rights:
Fill in the fields in the Database Settings:
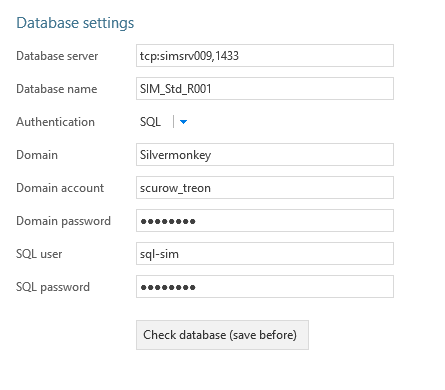
Click the ‘Save’-button, click the ‘Check database (save before)’-button.
The following Pop-Up shows the test result. If the test was not successfull, please check if the specified account has the correct user rights.
Setting up ConfigMgr Connection
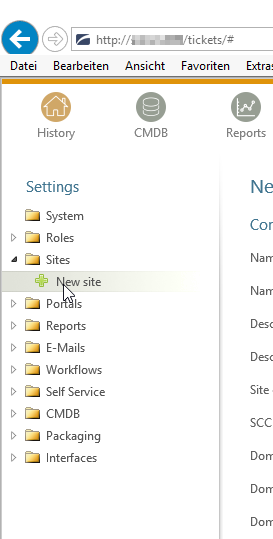
Silver Monkey Administrator rights are required to set or update the Configuration Manager Connection. If the “Settings”-Tab is visible, you got the required rights:
Expand the ‘Sites’ entry on the left side and choose ‘New site’:
Fill in the red-lined fields as seen below.
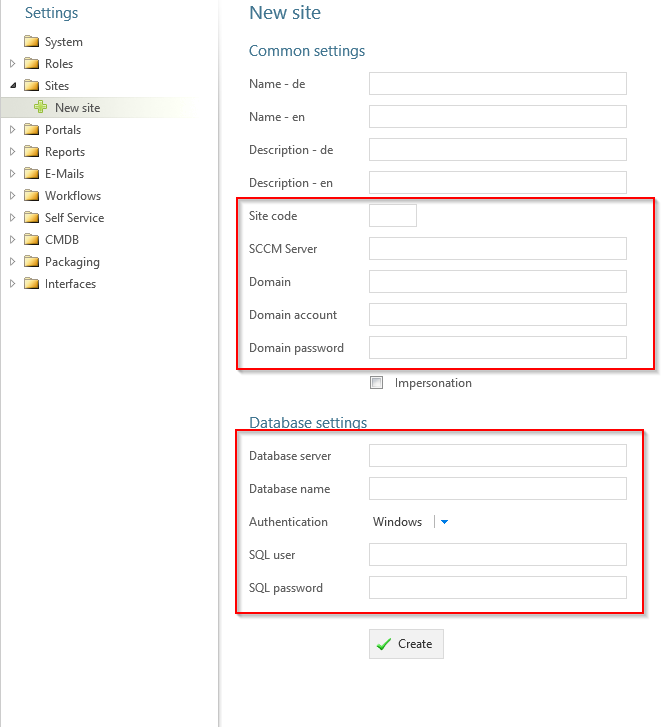
Visit: KB00017 - Configuration Manager Rights to see which rights are required for the SCCM Service account and the SCCM SQL Service account.
Click the ‘Create’-button.
Note
The rest of the fields will be filled in in the configuration step of the implementation.